Tuesday, December 3, 2013

Making a card box using the WRMK Envelope Punch Board

Do you make lumpy bumpy (technical term) cards that won't fit in a regular envelope?

Do you have the We R Memory Keepers envelope punch board?

If the answer to both of those questions is "yes" then read on.

By slightly adapting how I use my WRMK envelope punch board I can now make boxes that fit my lumpy bumpy cards.


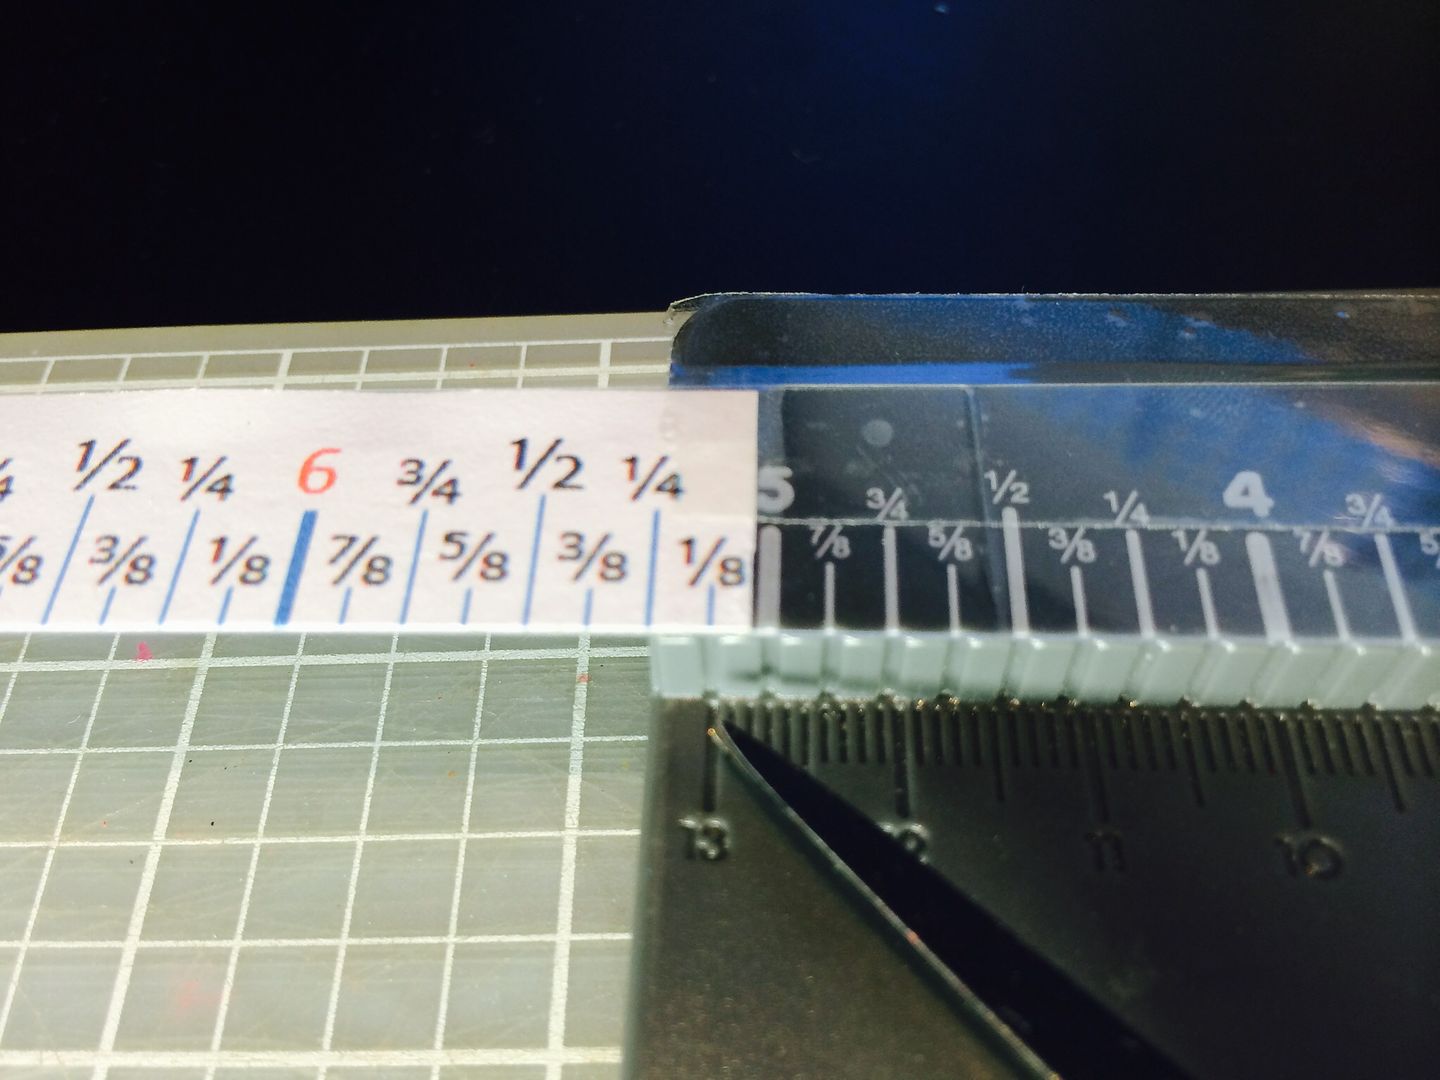
To do that I extended the ruler on the punch board so that it looks like this:


Preparing your punch board


I've created a ruler for you to print out that you'll attach to your punch board. 
  • Download one of the following files to your computer:
 If your printer uses A4
size paper

Ruler for A4.jpg

If your printer uses
Letter size paper

Ruler for letter size.jpg


  • Open Microsoft Paint and locate and open the file you just downloaded.
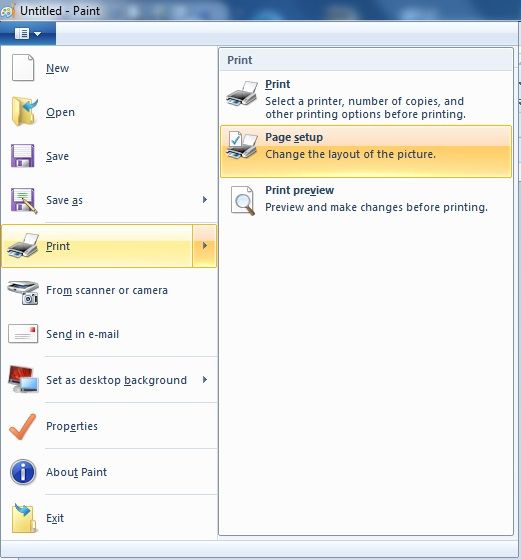
  • Click on the tab to the left of the Home tab
  • Hover over the Print Menu, then select Page setup

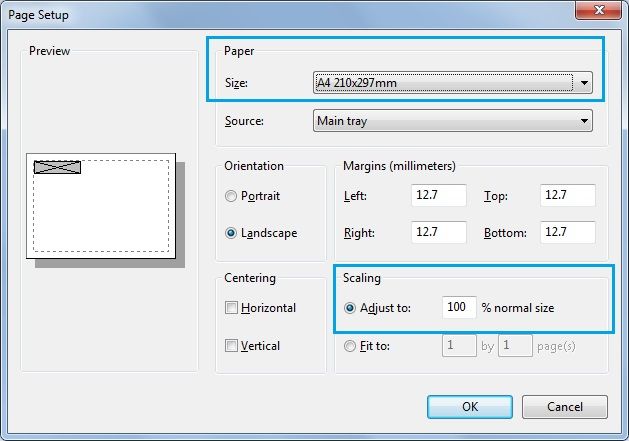
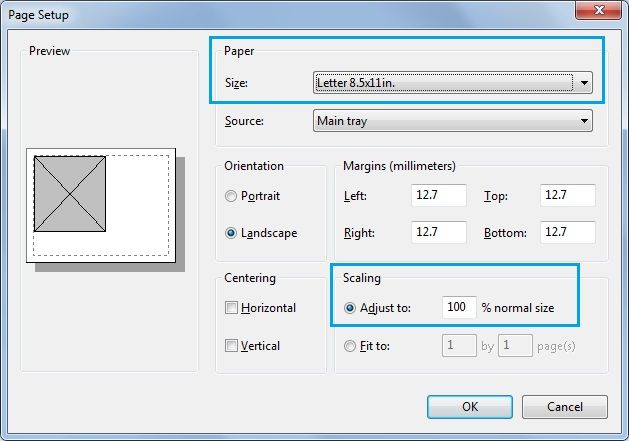
  • At the next screen make the following adjustments to the Paper Size and Scaling options.
A4 size printers


Letter size printers

  • Press OK. (Paint should revert back to its original Scaling settings when you exit the program.)
  • Print the file.
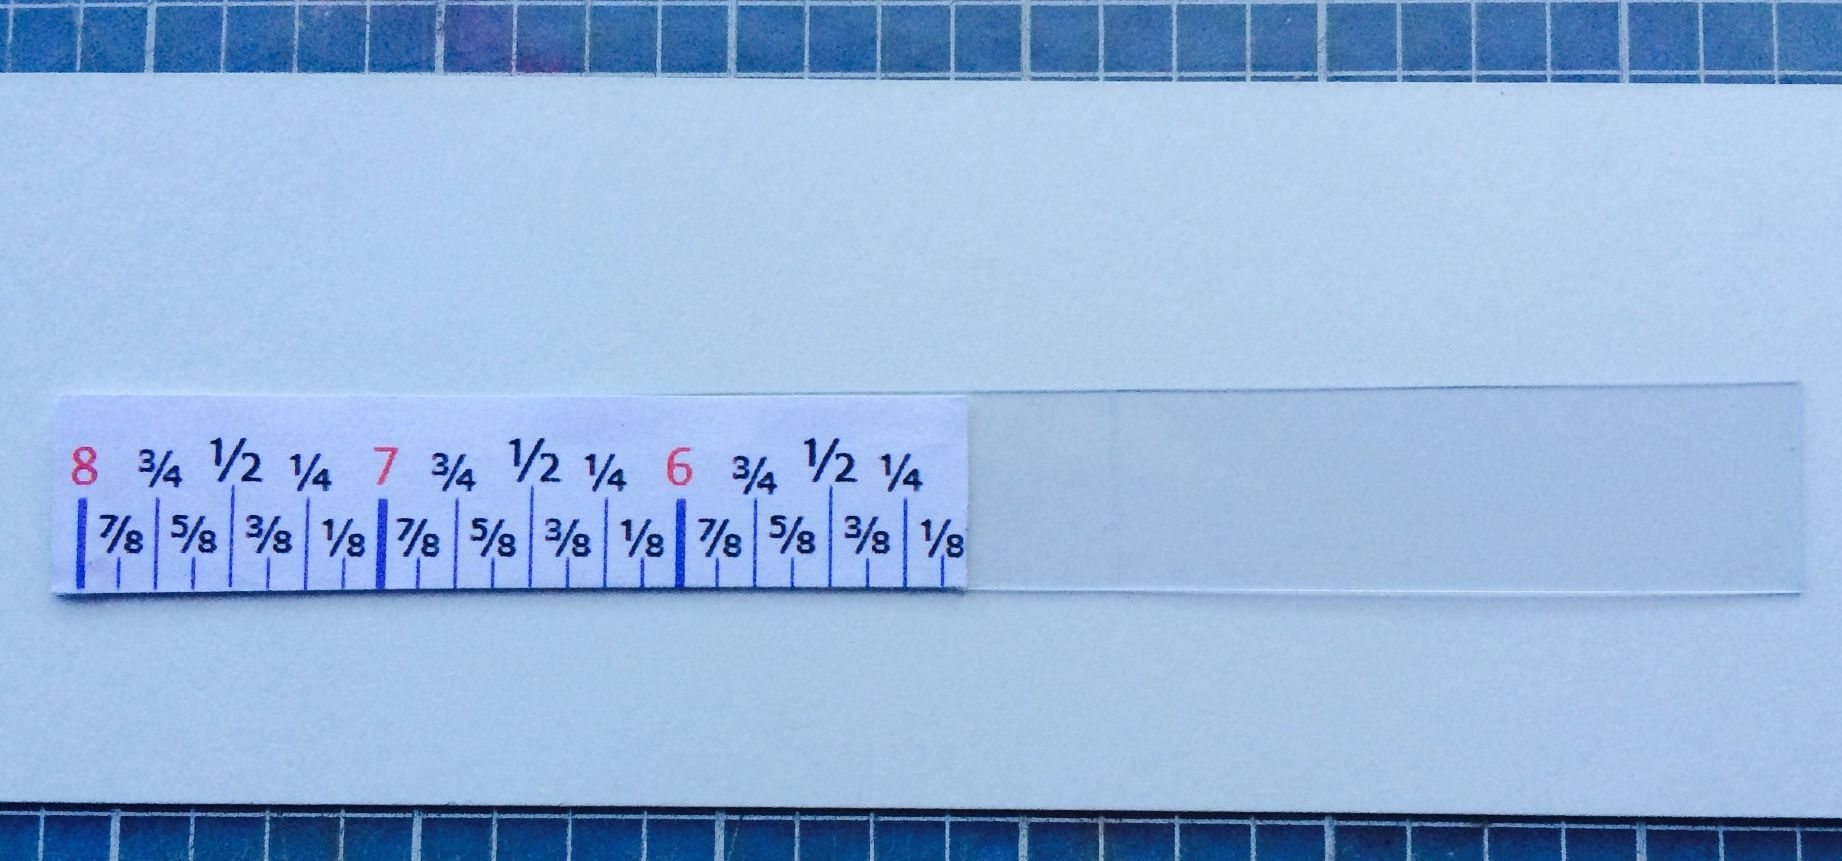
  • You now need to trim the ruler and attach it to your punch board.  Trim the right hand side to just after the 1/8" mark. That way it won't cover the 5" mark on the punch board
To give it some strength I adhered my ruler to some clear acrylic from an old Cricut cartridge clam shell. (You could also just print the ruler out on thick cardstock.)

I cut the acrylic about twice the length of the paper ruler. Here's what it looks like before I attach it to the punch board. I used double sided tape to stick the ruler to the acrylic.


  • Next you need to tape the ruler to the punch board. It's important to line the 1/8" mark on the paper ruler up with the last 1/8" mark (just to the left of the 5" mark) on the punch board, otherwise your measurements will be out. 
  • You also need to make sure you attach the ruler straight. I used regular old sticky tape to attach it to the punch board.

So now your punch board is ready to start making card boxes!

I generally make my cards 6" x 6". But two other common sizes you might use are 4" x 6" and A2. In Australia it's also common to make cards from half an A4 sheet of cardstock. Those cards end up being approximately the same size as a 4" x 6", so I have used the same size boxes for both of those.

Making your card box


The next thing you need to do is cut and score the cardstock you're going to use for the card box. I've found this a great way to use up all that printed cardstock that I know I'll never use on a card. The thicker cardstock works best as the thin printed paper tends to tear when you're scoring it.

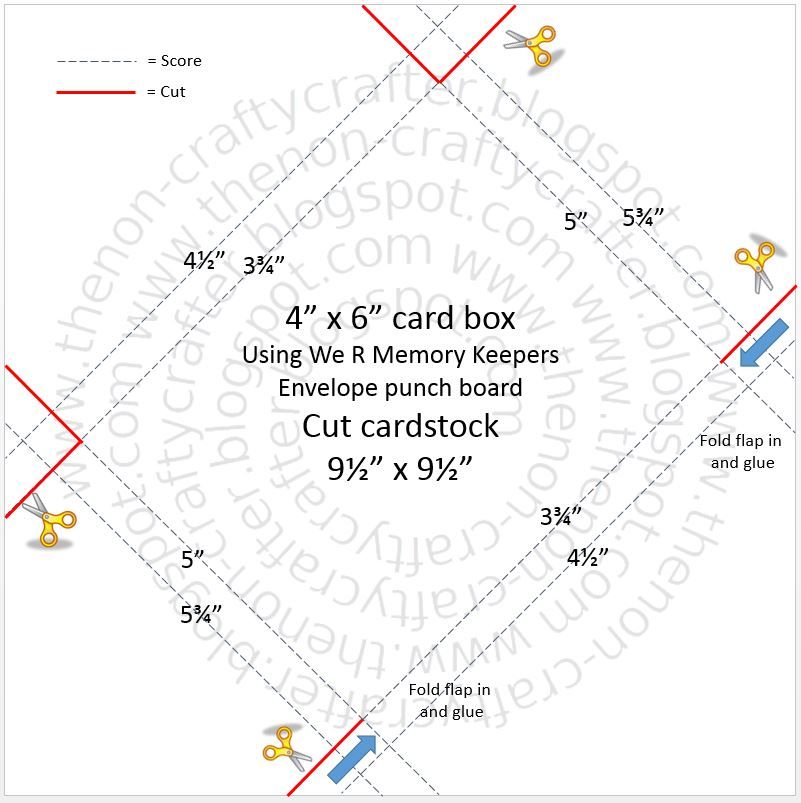
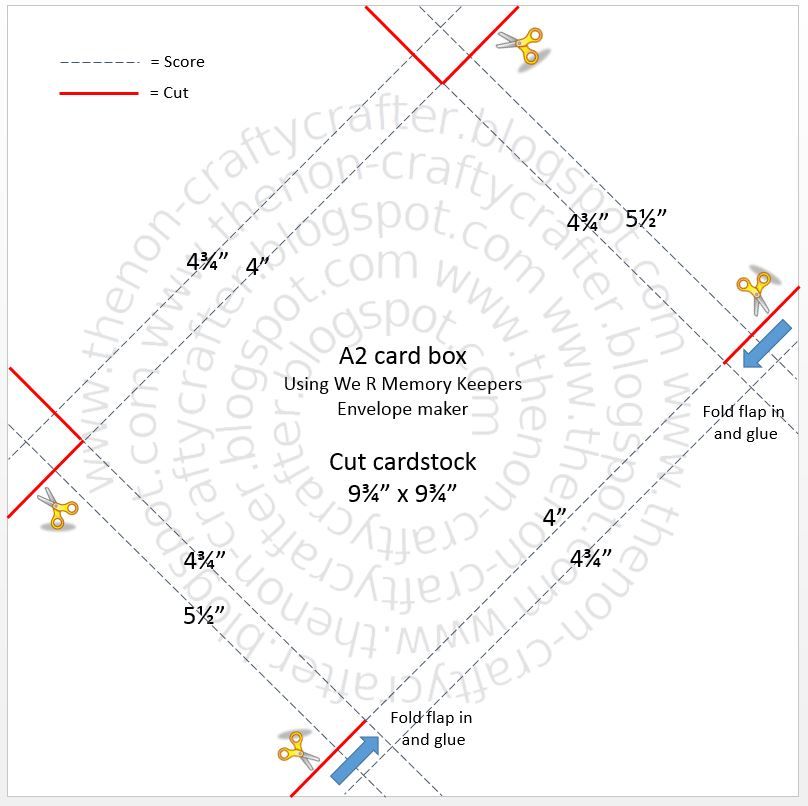
I have created three templates you can print out to use as a scoring guide. Click the picture to enlarge, then right click and save it to your computer. Or you can download a PDF of these templates from here: https://app.box.com/s/3y7eilysov1645m1gpjz

 Template for 4" x 6" and 10cm x 15cm card box

Template for A2 card box

Template for 6" x 6" card box

Let's start by making a 6" x 6" box.
  • Following the template I know that I need to cut my cardstock to 10 1/2" x 10 1/2".
(Because this is a square card all the sides will be scored the same, so it doesn't matter which side you start with.)
  • Place one edge of the cardstock on the punch board at the 5" line and score. You won't be able to score right to the edge of the cardstock but that's fine!
 
  •  Move the cardstock over to the 5 & 3/4" line and score again.


Unlike when you make an envelope with the punch board we do not punch these score lines.
  • Score the next three sides of the cardstock using the same measurements. (5" and 5 3/4"). (I've marked the score lines with pencil so you can see them.)
  • Turn the punch board around and punch the four corners. (If you don't want rounded corners on the box you can skip this step.)
  • Use your bone folder to crease along each of the scored lines

  • Decided which side you want to be the top of the box. (Again, as this is a square box it makes no difference, unless there's something on the cardstock that you want to make a feature.)
  •  Following the cut lines on the template use your scissors to cut along the two horizontal lines at the bottom of the box, and cut out the two triangular pieces at the top of the box. I've marked the cut lines in pink below...

  • Fold in and glue the two bottom flaps that you have just made. (You can cut these out the same way as the top triangles if you wish. I think this way just gives the bottom of the box a bit more support.)

  • Place some doubled sided tape along the two sides of the bottom flap.

  • Now, to put the box together fold in the sides then fold up and adhere the bottom flap. I used a piece of craft foam that is about the same depth as the box to help me line up the edges.  


  • I then used a removable sticky dot to seal the envelope.

This will give you a card box with about 1/2" depth. Hopefully enough for even the lumpiest and bumpiest card!

The other two card boxes are put together in the same way. Use the template as a guide and remember that the measurements on the long sides are different to the measurements on the short sides.

Please note... I don't use these card boxes if I'm posting the card unless I am enclosing it inside a parcel.

I hope you have found this tutorial useful and here's hoping you get a lot more use out of your envelope punch board!


Sunday, November 17, 2013

CRICUT: Tablescapes Fall & Winter boxes assembly

I had an email last week asking for help on how to put the boxes on the Tablescapes Fall & Winter cartridge together.

So I put a video together showing the steps. Hope it helps.


Thursday, November 14, 2013

CRICUT: Layering in CCR

Layering is a breeze in CCR. You just need to follow a few simple steps....

The most important thing to remember is that you must have Relative size selected. Otherwise each layer will be exactly the size that you have set as the Default Height. Using Relative size means that each of t-he layers of the image will be cut in proportion to the main image. (In this case the main image is the one on the Basic tab.)

You will find the Relative size button below the CCR keypad. If the button is green, it is active.
 

You also need to remember not to resize individual layers. You should select all the layers on your mat and resize them at the same time. More on that later!

Here's an example using the Raccoon from Create A Critter.

The picture below shows you the page from the handbook that has the raccoon on it. In this cartridge each of the layers is on its own tab. Some cartridges though will have some of the layers on the <Shift>  of the image keys.

 I have circled the images that I will be using. Note that each layer is on the <Non Shift> keys. I'll be using the Base (Basic) layer, Layer 1, Layer 2 and Layer 3. I'll also use the Shadow layer. And because I have no idea what colour a Raccoon is supposed to be I'll use the colours that are in the handbook!  There's no Raccoons where I come from!!! :)
 

Now let's take a look at the CCR keypad for Create A Critter with the Raccoon circled.

You'll see the layer tabs above the image keys.


Don't forget you can zoom the keypad icons in and out by clicking on the - and + icons below the keypad. This makes it much easier to find the shape you are looking for. You should also see the name of the shape appear as you hover over the keys.


I want my finished shaped to be 2.5" in height. So I set that size in the Default Height box below the keypad. 


Now I'll start adding the layers to my mat. Here is where you have a couple of options. You can place all the different layers on one mat (spreading them out over the mat so you can position the different colours of cardstock needed) and cut everything at the same time.

Or you can create a new mat for each layer and send each layer to the Cricut one at a time. For this example I'm going to use a different mat for each layer.

I'm going to add the Shadow layer to the mat first because that will be the bottom layer. Each time you add a new mat it will automatically be added on top of the previous mat. (That is until you start moving your mats around.... then things get a bit messier.)
  • Click on the Shadow tab, then click on the Raccoon key. 

Because this is a new file the shape will automatically be placed in the top left corner of the mat. (No need to drag it there...)


I'm going to change the preview colour of this layer to black. Remember... changing the Preview colour is different to using the Auto-fill feature. The preview colours don't print and are merely here as an aid to see what your finished project will look like. It's a great feature because you can play with different colours on the screen instead of wasting your precious card stock!
  • Click on the red dot on the layer tab.
  • Drag the arrow on the slider down to the bottom to change the colour to black. (That's the quickest way to get black.) 
Or you can type 0, 0, 0 in the RGB boxes
  • Press the Apply button and the preview will now appear in black
 
  • To add a new mat for the next layer click on the + button next to the Layer 1 tab.

The active layer will have a light grey coloured tab. In the picture below that is Layer 2. Notice how the tab for Layer 1 is now a darker grey meaning that it's not the active mat.

  •  To add the next layer to our project click on the Basic tab. 
  • Then click on the the Raccoon key.

The image is added to the active mat beside the shadow layer. 


Next I'll change the colour of that layer. Going by the colour in the handbook I'll change it to a dark brown colour.
  • Click on the Yellow dot on the Layer 2 tab. 
  • Click somewhere in the yellow/orange zone on the colour wheel then drag the slider down to select a darker shade.

You can move around in the colour wheel to select different shades of a colour. You can also move the slider up and down to change from light to dark tones of that colour.
  • Select the shade you like then press the Apply button. (If you want to use that colour again later write down the RGB codes from the boxes below the colour wheel.)

Next we'll add the image from the Layer 1 tab.  
(This can get confusing when our mat layers are called Layer 1, Layer 2 etc and so are the tabs on the cartridge keypad....!! You can rename your mat layers if that helps by double clicking on the the mat layer name and overtyping it with a new name.)
  • Add another mat to your project
  • Click on the Layer 1 tab on the keypad then click on the Raccoon to add it to the active mat.

I'll change the colour of this mat to a medium purple shade.
  • Click in the purple area of the colour wheel and use the slider to select a medium shade.
  • Click Apply

Using the same method as above I'll add the two remaining layers each on their own mat. The Layer 2 image is a dark purple and the Layer 3 image is a pale purple. Once that's done your screen should look something like this:


You can move the shapes on each mat on top of each to see what the final image will look like when it's cut out and put together. Click on the brown layer and slide it over the black layer and align it. Repeat for the other layers until you get something like this:


When you're ready to cut the project you can either move the shapes to different areas of the mat and cut each layer in turn. Or you can copy and paste everything to one layer, load up your mat with each of the colours and cut it all at once.

If you decide you want to resize your images make sure you select all the layers first. To do that select Ctrl A (Cmd A for the Mac) or select Edit, Select All. Then use the bottom right handle on the images to resize all the layers together. That way they'll all stay in proportion.

(If you have pressed the eye button (hide/show mat) on any of the mats, the image/s on that mat won't be selected. Press the eye button again to view those mats again. Then Select All.) I hope that helps you with your layering!!

Wednesday, November 13, 2013

CRICUT: CCR - Copying or moving objects to a different layer

Do you want to copy or move images from one mat layer and place them on a different mat layer? Well here's how you do it.

Download a PDF of  this tutorial from here: https://www.box.com/s/z77t7d08meyhsiu77m24
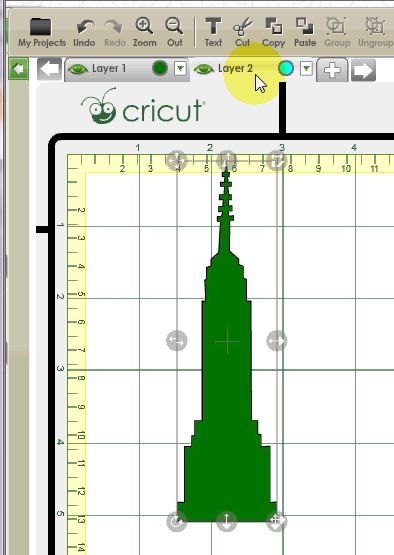
  • Place your image on the mat
  • Click the + button next to the Layer 1 tab.

A new layer (Layer2) will be added to your project.


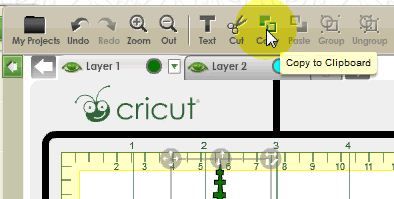
  • Click on your first image to make sure it's selected then press the Copy button on the toolbar

The image will be copied to the clipboard.
  • Click on the tab for Layer2 to make it active. (It will turn light grey.)
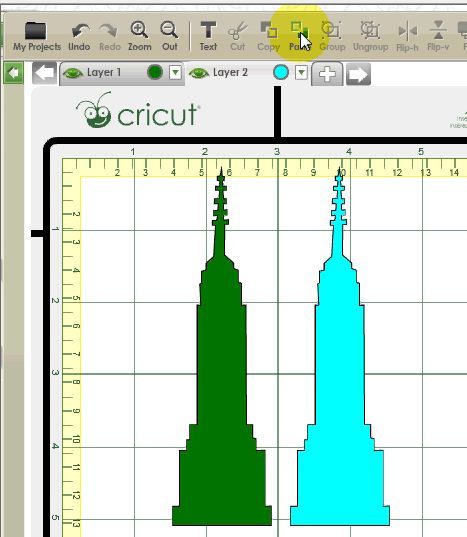
  • From the toolbar click the Paste button 

 The image will be pasted to Layer 2.


You can see that it worked because the pasted object is a different colour to the original and matches the coloured dot beside the layer name.

If you want to move your image from one layer to another instead of copying it, you can follow the instructions above and simply press the Cut button at instead of the Copy button. Or.... You can follow the instructions above (Copy and Paste) then just go back and delete the image from the first layer after you have pasted it to the second layer.  

Copying multiple images

You can use the same process to copy multiple objects. Just select them all before you click the Copy button. (There's no need to group them.) This even works for images that are on different mats!  

Having problems getting it to work? Keep the following in mind....
  • Before you select the Paste button ensure that the correct layer tab is active (light grey)
  • Make sure the layer you are pasting to is visible. The eye next to your layer name should be green. (Like the picture above). If the eye is grey your layer is hidden and you won't see your pasted object.  Click the eye to make the layer visible. Once you make the layer visible the pasted image should appear.

Got any questions? Just ask!! 


Related Posts Plugin for WordPress, Blogger...