Friday, February 28, 2014

CRICUT: Using Imagine Art cartridges in other Cricuts

Bought an Imagine cart by mistake? Here's how you can use Imagine Art cartridges with Cricuts other than the Expression. 

First, you will need a friend who will let you link the Imagine cartridge to your cricut.com account using their Imagine or Expression2. (Make sure you're logged into your account, not theirs!!)

Once you've accomplished that all you need to do is connect your Expression to your computer, create your design using the linked Imagine cartridge and send it off to cut!

Don't have a friend with an Imagine or E2? All is not lost. This will also work with the Digital Imagine cartridges that you can purchase from Cricut.com.

Surely it can't be that easy???? Well... there are a couple of things to keep in mind.
  • As the Expression doesn't have any printing capabilities you will only be able to cut the images from the cart. For the same reason you can't use the Imagine Colors and Patterns carts.
  • You will need to edit the images before you cut them as they are made up of multiple layers. For example this image from the Best Friends cartridge looks like this in CCR when the Imagine is selected as the default machine:

And like this if the Expression is chosen:


If you were to cut the image as it appears above this is what you'll get:


A jumbled mess of useless body parts! That's because every single line in the image is cut. To get a useful cut of the image here's what you need to do.

Select the image on the mat and click the Edit Group button


The Combine/Separate buttons will appear in the right corner of the screen. Click the Separate button.

Now your image will look like this:


Click the Exit button (or press Esc) to go back to the mat screen.

Now when you cut your project, each of the five layers will cut separately. At the moment they are automatically grouped. To move the individual pieces around on the mat click the Ungroup button on the toolbar. You can then space each piece out on the mat allowing you to load your mat with different colours of cardstock.

Remember, if you want to resize the image once you've ungrouped it, you will need to select all the pieces by using Ctrl A (Cmd A) or select Edit, Select All. Then use the resize handle to increase or decrease the size of all the pieces at the same time.

As you can see from the image above, you will lose the facial features of the image as those parts are only printed. Time to break out those Peachy Keen stamps you've got stashed in your drawer!

Play around with the different Imagine cartridges in CCR before you start purchasing them. Some images will work better than others.

Here's another example:

An image from the JT Imagine cart as it would print:


That image when the layers have been separated (still with the Imagine selected as the default machine):


And how it looks when the Expression is selected as the default machine:


So if you're one of those cartridge collectors that has accidentally purchased an Imagine Art cartridge, all is not lost! Have fun experimenting. 


CRICUT: Design Space... first impressions

These are my first observations of the Cricut Design Space program. 

I'm keeping in mind that it's new and that there may be changes/additions. And I get that I'm used to using CCR and the old Design Studio.... 

I had such high hopes for this program and really wanted it to be amazing! The Explore looks like such a great machine... it deserves great software. Don't get me wrong.... it absolutely does have its great points, but the negatives are big ones in my opinion. (And as it's my opinion, no-one has to agree with me...)

Many of us use other brand cutters beside the Cricut so we are used to other design programs. And those programs are amazing and have all the features you would expect to get the best out of your cutter. (Offset anyone???)

So, as I said... my first observations...

Pros
  • When you select an image and place it on the mat, all the layers are placed at the same time. (However if you only want one or two parts of the image you have to ungroup and delete or hide the unwanted parts.)

  • You can move the images around on the cut preview screen. That means you can load your mat up with different colour cardstock and just keep selecting which layer you want to cut. Just because the mat you see at the cut screen is totally covered with one colour, it doesn't mean you have to use full sheets of cardstock.


  • Not sure if this fits in the Pro or Con category, or whether it's just an oddity.....Dragging the middle left arrow to the right horizontally flips the object. Dragging the right middle arrow to the left flips the object. Same goes for bottom middle arrow, but it flips vertically. Unfortunately the shape also stretches while you're flipping... so I'm not sure how useful this is.

    (I'd much prefer one of these arrows be a move handle so you could move your object horizontally or vertically.)
   

  • You can do multiple lines of text in one text box and you can left/center and right align them. You can also increase the line space between the lines of text.


Once you've typed your text click on the All Fonts heading in the Edit box to change between All Fonts, System Fonts (those that are on your own computer), Cricut Fonts, Single Layer and Has a Writing Style.

Each time you select a different font the text in the preview box will change.
  • You can select multiple images from the carts/image library and insert them onto the canvas at the same time

  • There's a score line image that you can insert onto your shape. Yay!! No more ugly tick marks!!!
(Unfortunately.... that image currently says it's unavailable. Hopefully that will be fixed soon!)  Fixed!
It's a bit clunky to use. I think some more work needs to be done here. It's difficult to resize and also difficult to position in the correct place on your object. (Make sure after you have placed the score mark on your mat, you click on the little constrain proportions image between the width and height boxes. That will allow you to keep the width at 0.01" while setting the height to whatever you need.)
The score line is now easier to use since the April 2014 update! 

You can rotate the score line to make it horizontal or at an angle, but you can't curve it.

To find it type "Score line" in the Search box (with All Images selected) then press the search button.


  • And of course, the most important "pro" to some is the ability to import svg, dxf, jpg, gif, png and bmp image files and cut them on the Explore. For links to some popular online stores that sell svg's etc look in the sidebar to the right of this post.

Cons
  • There's no Cricut keypad..... not sure whether that's good or bad, or whether it really doesn't matter considering all the layers are placed on the mat for you.
  • You have to ungroup images/text before you can use Hide Contour.
  • Even on my brand spanking new souped-up computer and fast internet speeds there is still lag.
  • You have to ungroup images/text to weld. Remember Cricut Craft Room....where two images only have to touch each other and they are automatically welded....? 
  • You can't unweld!!! Seriously... so you've gone to all the trouble of ungrouping your images/text so you can weld them.  Then later you decide you don't like how/where you've welded them and want to move the weld position.... Too bad - you'll have to restart because you can't unweld them. (You can select Edit, Undo but say you've done 5 other actions since you welded... you'll have to undo all of those first before you can undo the weld.)
  • There is no offset function! This one really upsets me. Seriously.... how long have we been begging for this??  Stretching an existing shadow is in no way comparable to being able to create an offset. Or multiple offsets...  If I weld letters into a title (still rolling my eyes about the welding) and then attach an image to it, I want to be able to create an offset shadow around it.

    Just like the yellow offset around this image from the Groovy Times... this is what I want to be able to do.

  • There's no skew function
  • There is no Align function. If you want to align multiple objects (eg at the top) you'll have to change the Y coordinate on each of them individually to be the same. Selecting all the objects and changing the Y coordinate moves them all but only one of the objects you select will move to that coordinate. The others will move up or down but not to the Y coordinate you set.
Fixed! An align tool has since been added. 
  • There is no crop tool... or eraser tool. (There's now a slice tool though which is pretty cool.)
  • You can't cut images that have gone outside the mat boundaries. If the image is larger than 12" wide, when you click the Go button you will get an error saying the image is too large for the mat.
I think PC really did themselves a disservice here. They had an amazing opportunity to make their new machine able to cut a true 12x12 image and they didn't take it. I wanted to make a card base the other day that was 12x12... it can't be done!
  • Can't move images that you don't want to cut off to the side of the canvas as they are placed back within the cutting boundary. (Instead you click the Hide/Unhide button and that image won't appear on the Cut screen.
  • The middle left handle doesn't move the image to the left, it stretches it. (The same applies to the middle top, bottom and right handles.) This makes moving image horizontally or vertically on its X or Y measurement impossible unless you repeatedly use the arrows on your keyboard (because holding down the arrow doesn't work) or you use the X & Y coordinates in the Edit menu. Which leads me to......

     (The handles have since been moved to the corners of the image.)
  • The Y coordinate is fiddly to change...  To change the X coordinate you just drag your mouse over the figure in the box and you can overtype it. With the Y coordinate you have to hover to the right of the box until you see the little "I beam" then click and drag backwards to select the figure.. then overtype it. That's a pretty easy thing to fix though...
Looks like they fixed this problem. :)
  • Right clicking doesn't show you which font/image you have used. But the layers box will tell you the name of the cart. 
So, I'm sure it used to show you the name of the cart in the layers box, but now it doesn't even do that! 
  • There are no cutting boundary indicators on the canvas so you won't know something is too big or goes outside the cutting boundary until you click the Go button
  • The mat canvas sits at X 1.0" and Y 1.0" instead of at 0" (The screen you design on isn't actually a mat. It's more like your desk where you toss everything you're working with on it. Once you have everything where you want it you press cut and DS sorts everything by colour and moves everything that's the same colour to a cutting mat.
  • You can only have one canvas open at a time. 

That's it for now!  


CRICUT: Design Space is live!

The day has arrived.... Cricut Design Space has been launched!


To access it go to the Cricut.com home page http://main.cricut.com/home then click on the Cricut Design Space menu at the top.

Have fun!

I'll have my review up soon.


Thursday, February 27, 2014

CRICUT: Cricut Explore FAQ's

Looking for more info about the Explore and Design Space?  I stumbled on the FAQ's.....


Here's the link:

http://www.cricut.com/home/support/faq's#


When you get there click on the picture of the Explore, then select Cricut Explore from the menu.

Lots of info there!!!


Thursday, February 20, 2014

CRICUT - Pagoda cartridge Kanji Symbols

The names of the Kanji symbols in the Pagoda handbook are quite difficult to read. In fact many people don't realise the names are even in the handbook.

So I've put together this table. It shows a picture of the symbol, the name and the page number that it appears on in the handbook.

You should be able to enlarge the picture by clicking on it. You can then right click and save it to your computer.

Hope it helps!  If it does, I'd really appreciate it if you'd click on the Join this site button to follow my blog. :)


CRICUT: Design Space - Videos!

It's great to see that Design Space videos are finally being released. I'll keep adding the good ones as I find them!

First the official Provocraft videos

Make sure you subscribe to their Youtube channel so you don't miss any new ones.
Official Cricut You tube channel


https://www.youtube.com/watch?v=-8-a3qD8nqE


http://youtu.be/JtACAK3uI3o


http://youtu.be/bFvmpZKJo_Q


http://youtu.be/fMT54TiWSpk


http://www.youtube.com/watch?v=6-fIbOic8Rs&feature=share&list=UUenmvBlGmukLZG0ELpS6mRQ&index=3


http://www.youtube.com/watch?v=wTsRwvnkOBE&list=UUenmvBlGmukLZG0ELpS6mRQ&feature=share&index=4


http://www.youtube.com/watch?v=TIYTVBWROPY&list=UUenmvBlGmukLZG0ELpS6mRQ&feature=share&index=5


http://www.youtube.com/watch?v=L3dwpl19crY&feature=share&list=UUenmvBlGmukLZG0ELpS6mRQ&index=8


http://www.youtube.com/watch?v=i88DDJB6oBA&feature=share&list=UUenmvBlGmukLZG0ELpS6mRQ&index=10


http://www.youtube.com/watch?v=av4z6lRZVRs&feature=share&list=UUenmvBlGmukLZG0ELpS6mRQ&index=7


http://www.youtube.com/watch?v=WhugZonAzQk&feature=share&list=UUenmvBlGmukLZG0ELpS6mRQ&index=14


These are from Joy at Obsessed with Scrapbooking who was lucky enough to attend the Explore reveal at the ALT summit.

CRICUT: Design Space - Do I need a subscription?

Because this question is being asked a lot...


Tuesday, February 18, 2014

CRICUT - Comparison Chart CCR vs Ds vs Gypsy vs Design Space


Cricut Craft Room/Design Studio/Gypsy/Design Space

A comparison by Narelle Darley – The Non-Crafty Crafter
(Updated to add Design Space - 18/02/2014


* If you use PC emulating software you can run DS on a Mac
** Whilst you can use the Jukebox with CCR you may still have to press the correct button to select your cart/s.
*** Unless you save your DS file as a Gypsy file.

Sunday, February 16, 2014

CRICUT: Design Studio - cutting an oversized paper doll

Today I’m (finally) going to show you how I made the door sized paper doll from the paper doll teen scene cartridge for by daughter’s bedroom door.


I've been asked for a tutorial on how to do this ever since I posted the pictures of the one I created back in May of 2012. 

Most recently I was contacted by a Cricut messageboard member by the name of Cookie who is struggling with some medical issues at the moment. So this is for you Cookie! Hope you are feeling better soon!

This can only be done using Design Studio or a Gypsy as they’re the only two Cricut programs that allow you to cut images that go outside the cutting boundary of the mat.

Teen Scene is made up of 5 different paper dolls all with different outfits and hair. Each doll has its own row on the keypad.

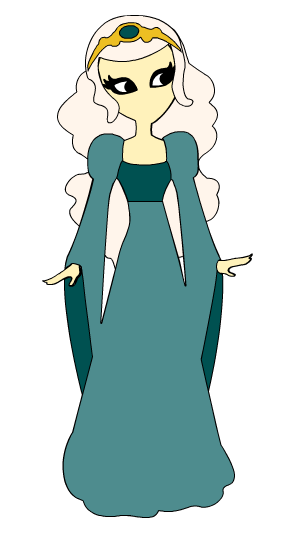
Here’s a picture of the doll that I’m going to be making. You’ll find her on page 41 of the handbook. 


Her name is Chloe and I’m going to be making her with the Costume key and using the Wardrobe 2 option.


I've tried many different ways of making these oversize dolls and I believe that this way is the easiest! 

I’ll be making this doll approx. 50” in height. You need to decide now what you want your finished size to be.

Before we get started there’s a few things we need to set up first.

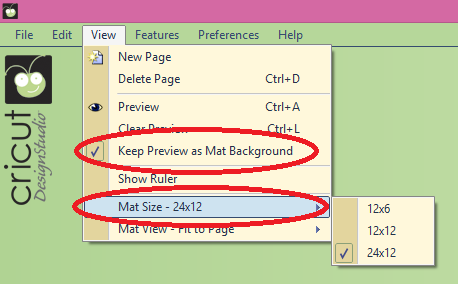
Go to the View menu and change to the 12 x 24 size mat. 

Note: If you don’t have a 12 x 24 mat you can still create a large paper doll. It will just take a little longer to cut it. If that’s the case then leave your mat at 12 x 12.

Also in the View menu make sure you have Keep Preview as mat background checked.


I have my Default size set at 5”, but that’s purely so that I can see the image on the mat. You can set that at whatever size you like.

Finally, make sure that the Real Size box is unchecked.  If you have Real size turned your layers won’t be sized in proportion to each other. 


Teen Scene is made up of 5 different paper dolls all with different outfits and hair. Each doll has its own row on the keypad. Chloe is the 2nd row and the Costume key is the last button on that row.  (I’ll call that the Chloe button.)

I’m initially going to add all the layers for this image to the one mat. 
Once I've re-sized them I’ll move each layer to its own mat.

I have a picture of the handbook page below that shows which image I’m making and the order that I’ll place them on the mat. 


The first layer is the Tiara.

Make sure the Shift Lock key on the DS keypad isn't pressed and select the Wardrobe 2 layer button. (Marked above as 1)


Click the Chloe button indicated above to add that image to your mat.


Press Enter to deselect that image (or click elsewhere on the mat.)

Press the Shift Lock button and then the Wardrobe 2 button. 


Then press the Chloe button to add the bottom layer of the gown to the mat. (Marked as 2 above.)


Press Enter

Turn off the Shift key then press the Chloe button to add the top layer of the gown to the mat. (Marked as 3 above.)


Press Enter

Press the Shift key then press the first feature key. Press the Chloe button to add the Skin colour layer to the mat. (Marked as 4 above.)


Press Enter

Click the Shift key to turn it off and press the Chloe button to add the black layer. (This layer is for the pupils and eyelashes.)


Press Enter

Press the first feature key to turn it off.

Press the Shift key to turn it on then press the Chloe button to add the white layer to the mat. (This layer makes the whites of Chloe’s eyes.)


Press Enter

Press the Shift key to turn it off.

Press the Chloe button to add the main base layer to the mat. This layer creates the hair.


Now you have all the different layers of Chloe on the mat.

Next you need to move all the layers on top of each other.

Click on the outline of the second last image (press the ALT key if the handles don’t appear) and move her over to the right so that she is sitting (or is that standing??) inside the base layer. 

Move her down slightly if necessary so that her head sits below the hair line and her feet finish just before the base layer’s feet.


Now select the next image to the left and again move it over on top of the other two images. They don’t have to line up. Just make sure it is inside the outline of the base layer.


Repeat the above for all the remaining images. You will have something that resembles this:


Don’t worry… you’ll unjumble her later!!

Now it’s time to resize your doll.

Drag a box around all the images. The base image should be the one that has the handles around it. (Which is why we added it to the mat last…) 


Click the top left handle and move all the layers over to the top left corner of the mat. 


Hold down the Ctrl key on your keyboard then using the bottom right sizing handle start dragging your mouse down to enlarge the images. Keep dragging until you can’t get the image any bigger.

Take a look at the Height figure in the Shapes properties box. You eventually want that figure to be around the finished size you want your project to be.

At this point you probably won’t be able to see the resize handle.


Release the Ctrl key and without clicking off the images (so don’t click anywhere on the mat or press Enter) use the up arrow on your keyboard to move the images up.

Keep going until the bottom right resize handle is at the top of the DS mat.

(Remember, if your handles have disappeared – but you can still see the boxes around all the images – press the ALT key to turn the handles back on.)


Now, again hold down the Ctrl key and drag the bottom right handle down until you can’t drag any further. Check the Height box so you know how much further you have to go.

Let go of the Ctrl key and use the up arrow on your keyboard to move the images up to the top again.

Hold down the Ctrl key and keep re-sizing.

At some point the bottom right handle will not only disappear below the bottom of the mat, but also to the right. When that happens you’ll also need to use the left arrow on the keypad to move the shapes to the left size of the mat so you can grab the handle again.

Repeat these steps until the paper doll is the approximate finished height. It’s pretty well impossible to get this to be exactly the size you want as you can’t type that size in the Height box. If you do that, all the other layers will be size that height too…. So near enough has to be good enough.

Here’s the Shapes Properties box showing a finished size of 50.002”. 


And here’s how my DS screen looks:


Congratulations… you've re-sized your doll! Now you need to give each of those layers its own mat.
Don’t click on the mat yet!!!  But you can let go of the Ctrl key now….

While you still have all those layers selected use the arrow keys on your keypad to move the images down and to the right until you can see all of them on the mat – including the Tiara layer. 


We currently have one page in our project. We need to have seven pages – one for each layer.
Click on the New Page icon 6 times to add 6 more pages.


These are the 3 toolbar buttons we’ll be using to move the layers to their own page:


Click on the first tab then click on the outline of the base layer.


Click the Copy button

Click on the last tab and click the Paste button

Go back to the first tab and press the Delete button. The base layer has now been moved to its own page.

To make it easier to know which layer is which it’s a good idea to rename the page title.

Click on the last layer then right click somewhere on the mat. 


Highlight (or delete) “untitled page” and type in a new name.

Press Enter on your keypad to save the new name.

I use the name of the layer (Base) and the colour I’ll be cutting it (Blonde – as this is the colour of the dolls hair. You’ll obviously name it whatever colour you’re going to make her hair.)


Go back to the first page and select another doll layer by clicking on the edge of one of the hands.

Yes… it’s a jumbled mess!! How can you tell which is which layer? Basically you’ll only know by selecting a layer and moving it down using the keypad arrows until you can see the face.

You can use this picture as a guide:


And these are the corresponding tabs:


Using the arrow keys on your keypad move the image you have selected down until you can see the face.

This is the layer I selected:


I can see that there are no facial features which means that it is the white layer – Layer 6. Which means I’ll copy and paste it to the 6th page.

Click the Copy button, then click on the 6th page tab.

Click the Paste button.

Rename this page to White.


Go back to the first page and delete the layer you just copied.

Now select another doll layer. Again, move it down so you can see which layer it is.

This time I have the Black layer. You can tell that by the small eye shapes.


Press the Copy button

Click on the 5th page tab then click the Paste button

Rename this page to “Black”


Go back to the first page and delete the shape you just copied.

Select the last doll layer which is the skin layer. You can tell that by its alien eyes!


Copy that layer and paste it to the 4th page.

Rename the page to Skin colour. (Or however you want to spell it!!)


Go back to the first layer and delete the shape you just copied.

Only three layers left… the two gown layers and the tiara/shoes.


Click on one of the gown layers and copy and paste it to its corresponding page.

Rename the page

Go back to the first page and delete that shape.

Select the next gown shape and copy and paste it to its corresponding page.

Rename that page.

Go back to the first page and delete that shape.

Now all you have left on the first page is the tiara and shoes. 

Rename that page.

Here’s all the tabs renamed:


On the first tab you’ll see the three images that make up the Tiara layer. The two bottom images are for her shoes. But in this doll the gown covers the shoes, so it’s not necessary to cut those.

To stop the shoes from cutting we use the Hide Contour feature to hide them.

Click on the outline of the left shoe. The outline will turn red.

Click on the right mouse button and the menu will appear.

You’ll see at the bottom of the menu “Hide Selected Contour”


Click that and the outline of the shoe will turn pink.

Click off onto the mat and the outline of that shoe will turn light blue. This indicates that it is now hidden and won’t be cut.

Repeat the same process to hide the right shoe.


Finally…. It’s almost time to cut your doll!

Go to the Base layer tab and move the shaped down until you can see her head. 


You’ll notice that there are two parts to her hair. You’ll want to hide one of those parts before you start cutting. For now click on the right hand shape and use the Hide Contour feature to hide that shape.

What’s that? It won’t let you hide the shape???  That’s because Design Studio won’t let you hide a shape that has been pasted. But that’s easily fixed.

Save your project (File, Save or File Save As if you haven’t yet saved it) then close that project. (File, close.)

(Don’t Exit out of Design Studio – just close the project.)

Now select File, Open and reopen your project. Hide Selected Contour will now be available on all your shapes again.)

Go ahead and hide the right hand hair image.


To make the most use of your 12x24 mat you should rotate your images 90 deg. (If you’re using a 12 x 12 mat you won’t have to do this step.)

Click on the doll shape that’s on the Base layer.

Move the doll up using the up arrow on your keyboard until her hands are around the 6” line. If you don’t do this the whole image might disappear off the mat when you rotate it.)


Click the Turn 90 button in the Shapes Properties box. (Click it a second time if nothing happens.)


The doll will now be shown sideways. 


Now using the arrow keys on your keyboard position the first part of the image so it’s within the cutting boundary of the mat. 


Load your mat with the appropriate colour card stock and send, load it into your Cricut (make sure you have the Teen Scene cartridge loaded) and press Cut.

When that section of the doll has finished cutting, unload the mat, carefully remove the image from the mat and place more card stock on the mat.

Move the base image on the mat so that a different section of the doll is inside the cutting boundary of the mat.

Make sure that you are re-cutting part of the previous section. That allows you to adhere the different sections together with tape. 


Keep moving the image around on the mat and cutting until you have cut the entire layer.


It takes about 4 ½ sheets of 12 x 24 card stock to create this layer.               


Once you have the base layer cut out move it around on the mat so you can see the hair section that you previously hid.

Click on that section, then right click and select Show Selected Contour.


Then select the section you have already cut, right click and select Hide Selected Contour.

You can now move the hair section inside the 12 x 12 boundary and send it to the Cricut to be cut.

And that’s the first layer cut!!

You now need to repeat those steps for each of the remaining layers. Remember to move the layer to the centre of the page first, then rotate it.

Good luck with cutting your oversize paper doll! And don’t forget… this process works for any of the shapes on any of the Cricut cartridges that can be used in Design Studio or the Gypsy. (That excludes the Imagine cartridges and any of the digital cartridges.)


Feel free to share a picture of your over-sized Cricut creation by clicking on the InLinkz link below!

Till next time!


Related Posts Plugin for WordPress, Blogger...