
Do you make lumpy bumpy (technical term) cards that won't fit in a regular envelope?
Do you have the We R Memory Keepers envelope punch board?
If the answer to both of those questions is "yes" then read on.
By slightly adapting how I use my WRMK envelope punch board I can now make boxes that fit my lumpy bumpy cards.


Preparing your punch board
I've created a ruler for you to print out that you'll attach to your punch board.
- Download one of the following files to your computer:
| If your printer uses A4 size paper Ruler for A4.jpg | If your printer uses Letter size paper Ruler for letter size.jpg |
- Open Microsoft Paint and locate and open the file you just downloaded.
- Click on the tab to the left of the Home tab
- Hover over the Print Menu, then select Page setup
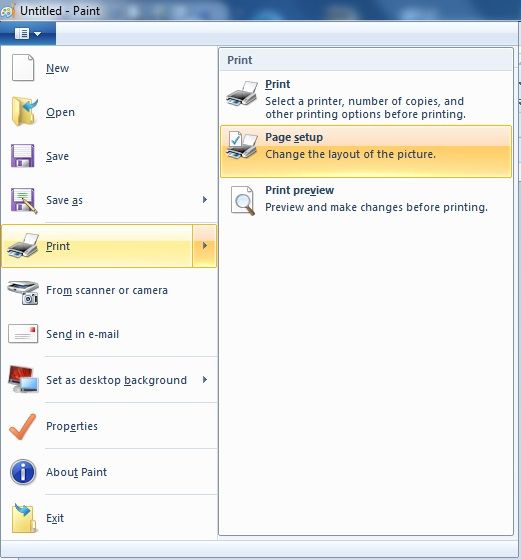
- At the next screen make the following adjustments to the Paper Size and Scaling options.
A4 size printers

Letter size printers
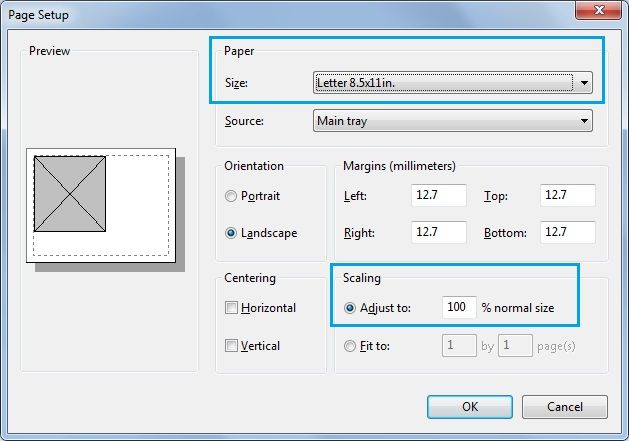
- Press OK. (Paint should revert back to its original Scaling settings when you exit the program.)
- Print the file.
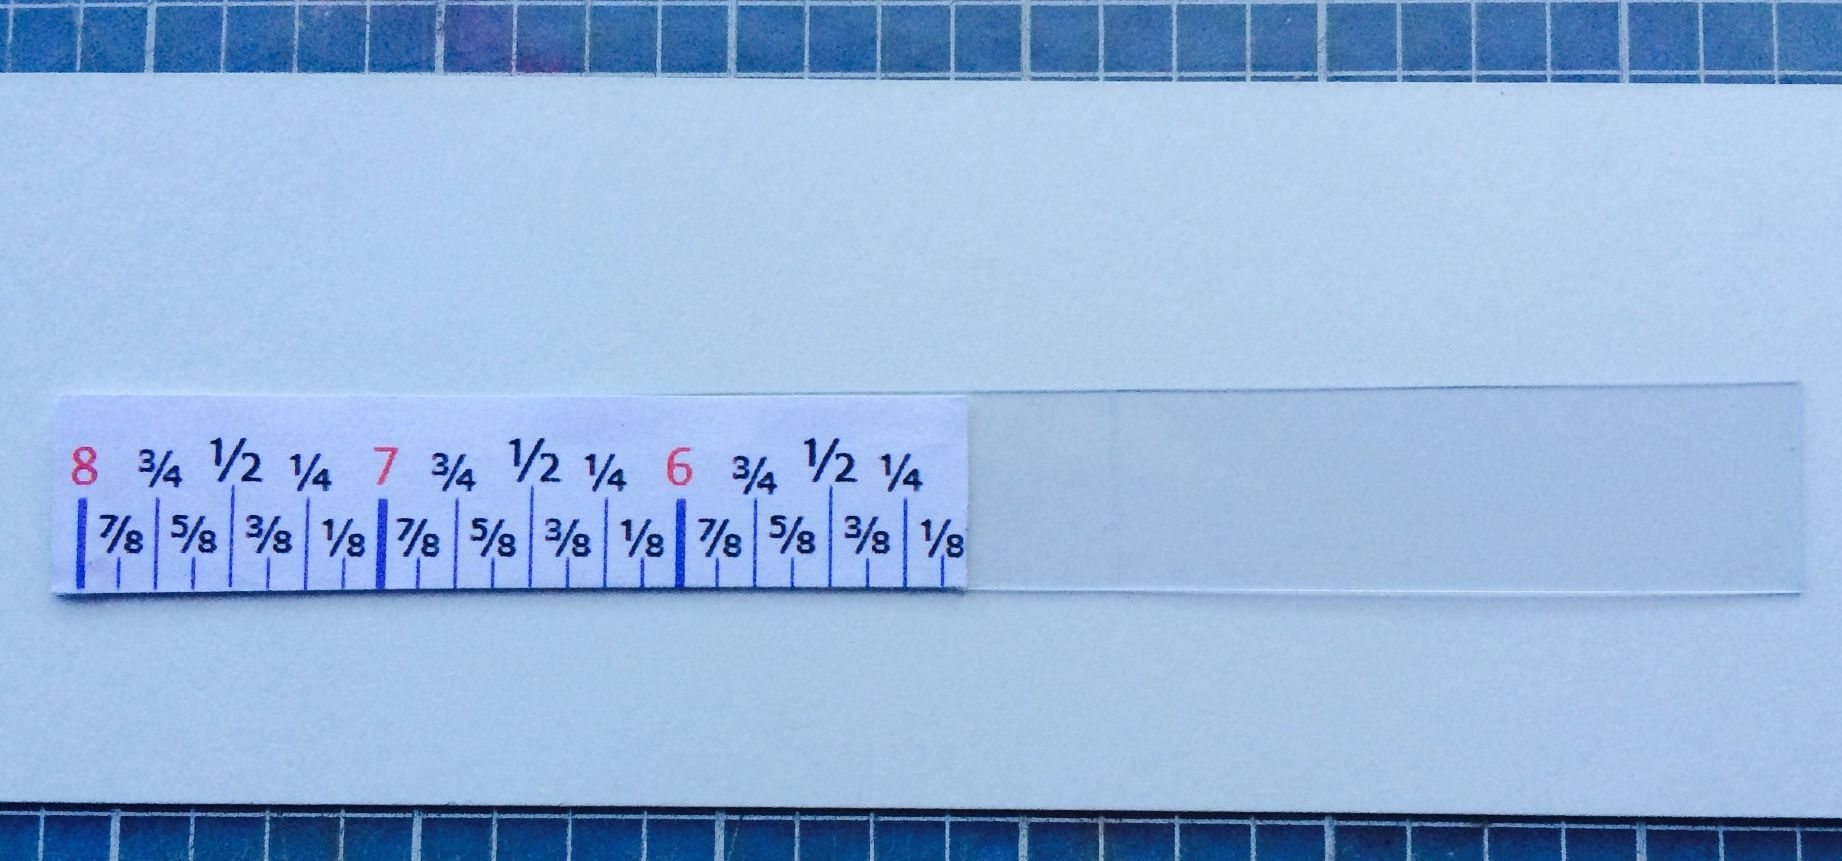
- You now need to trim the ruler and attach it to your punch board. Trim the right hand side to just after the 1/8" mark. That way it won't cover the 5" mark on the punch board
I cut the acrylic about twice the length of the paper ruler. Here's what it looks like before I attach it to the punch board. I used double sided tape to stick the ruler to the acrylic.
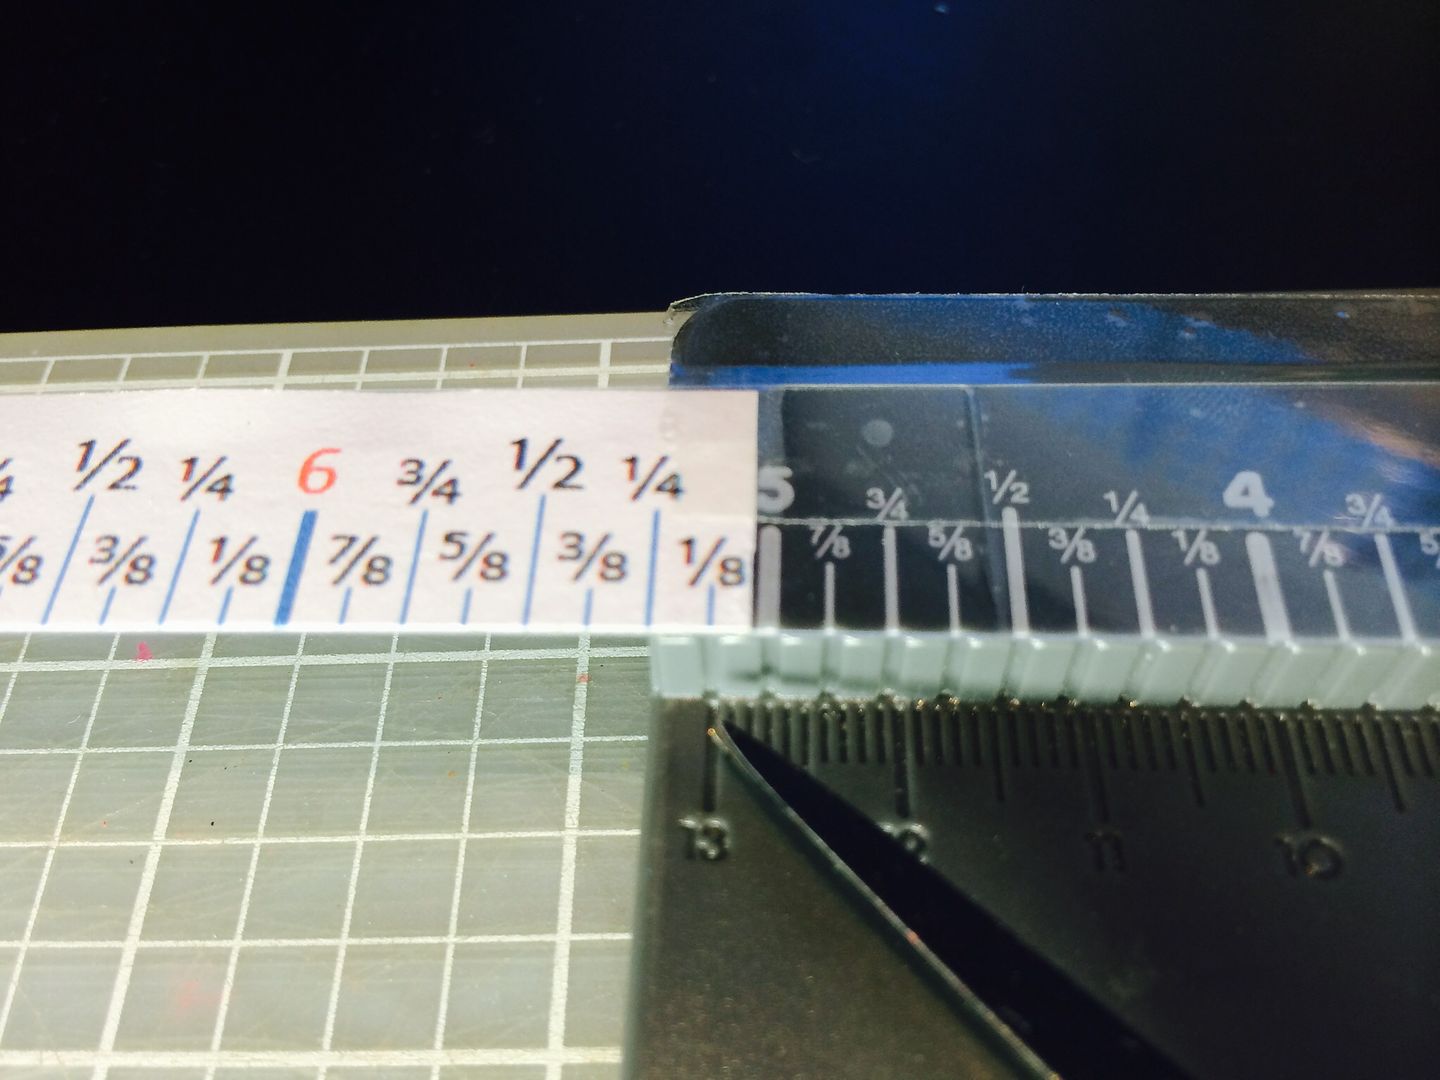
- Next you need to tape the ruler to the punch board. It's important to line the 1/8" mark on the paper ruler up with the last 1/8" mark (just to the left of the 5" mark) on the punch board, otherwise your measurements will be out.
- You also need to make sure you attach the ruler straight. I used regular old sticky tape to attach it to the punch board.
So now your punch board is ready to start making card boxes!
I generally make my cards 6" x 6". But two other common sizes you might use are 4" x 6" and A2. In Australia it's also common to make cards from half an A4 sheet of cardstock. Those cards end up being approximately the same size as a 4" x 6", so I have used the same size boxes for both of those.
Making your card box
The next thing you need to do is cut and score the cardstock you're going to use for the card box. I've found this a great way to use up all that printed cardstock that I know I'll never use on a card. The thicker cardstock works best as the thin printed paper tends to tear when you're scoring it.
I have created three templates you can print out to use as a scoring guide. Click the picture to enlarge, then right click and save it to your computer. Or you can download a PDF of these templates from here: https://app.box.com/s/3y7eilysov1645m1gpjz
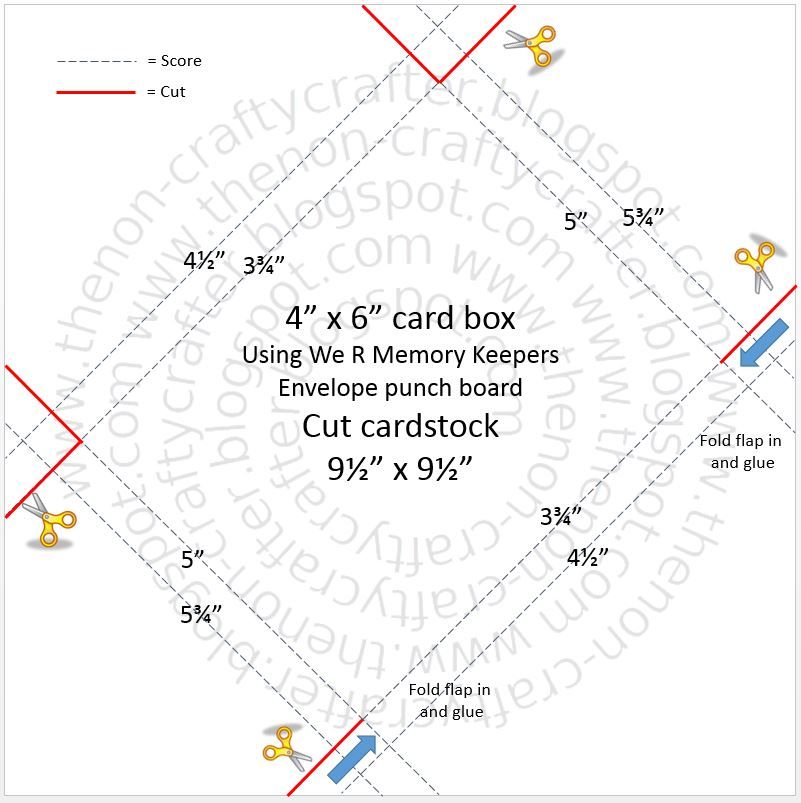
Template for 4" x 6" and 10cm x 15cm card box
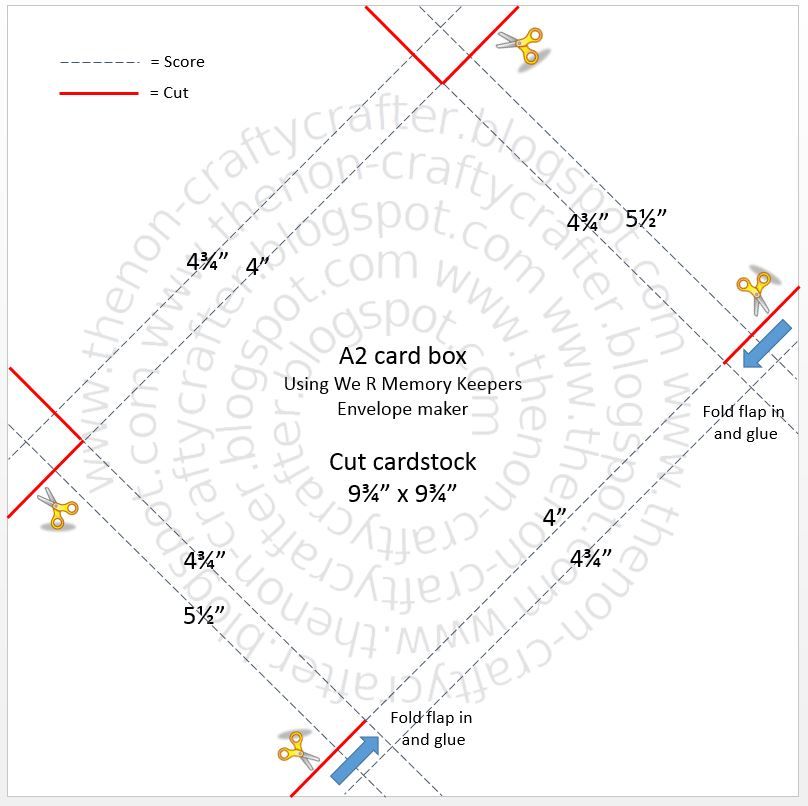
Template for A2 card box
Template for 6" x 6" card box

Let's start by making a 6" x 6" box.
- Following the template I know that I need to cut my cardstock to 10 1/2" x 10 1/2".
- Place one edge of the cardstock on the punch board at the 5" line and score. You won't be able to score right to the edge of the cardstock but that's fine!

- Move the cardstock over to the 5 & 3/4" line and score again.

Unlike when you make an envelope with the punch board we do not punch these score lines.
- Score the next three sides of the cardstock using the same measurements. (5" and 5 3/4"). (I've marked the score lines with pencil so you can see them.)

- Turn the punch board around and punch the four corners. (If you don't want rounded corners on the box you can skip this step.)

- Use your bone folder to crease along each of the scored lines

- Decided which side you want to be the top of the box. (Again, as this is a square box it makes no difference, unless there's something on the cardstock that you want to make a feature.)
- Following the cut lines on the template use your scissors to cut along the two horizontal lines at the bottom of the box, and cut out the two triangular pieces at the top of the box. I've marked the cut lines in pink below...

- Fold in and glue the two bottom flaps that you have just made. (You can cut these out the same way as the top triangles if you wish. I think this way just gives the bottom of the box a bit more support.)

- Place some doubled sided tape along the two sides of the bottom flap.

- Now, to put the box together fold in the sides then fold up and adhere the bottom flap. I used a piece of craft foam that is about the same depth as the box to help me line up the edges.


- I then used a removable sticky dot to seal the envelope.

This will give you a card box with about 1/2" depth. Hopefully enough for even the lumpiest and bumpiest card!
The other two card boxes are put together in the same way. Use the template as a guide and remember that the measurements on the long sides are different to the measurements on the short sides.
Please note... I don't use these card boxes if I'm posting the card unless I am enclosing it inside a parcel.
I hope you have found this tutorial useful and here's hoping you get a lot more use out of your envelope punch board!

