Showing posts with label Design. Show all posts

Sunday, January 21, 2018

Star Card Design Space cutting file

A few weeks ago a member from my Cricut Explore and More Facebook group was looking for a cutting file for a "Star" card that she had seen in one of her local groups.

With the help from some other members we were able to track down a photo of that style of card and then a video that showed how to create one with a trimmer.

To make it easier for our members to make this card I created a Design Space cutting file.

Here's my two samples.


You can add whatever embellishments you like to the card.

The two front pieces are adhered together. You then insert those pieces into the slots on the back piece.  The two front pieces must be removed from the card and the back piece folded in half so it will fit into a 5.75" square envelope.  The receiver of the card then just needs to pop to two front pieces back into the slots to display it.

Here's the link to the video that I watched to help create my cutting file.  Thanks to Ann for working out the dimensions.  https://youtu.be/ZWCuxKyR9w4

I've called mine a "Triple Triangle card"

You will find the free Design Space cutting file in the Design Space Projects Links album over at Cricut Explore and More.  


Happy crafting!  ♥


Friday, August 11, 2017

CRICUT: Welding in Design Space

**This post contains affiliate links and I will be compensated if you make a purchase after clicking through my links.


Here's an article I recently wrote about Welding in Design Space. Hope you find it helpful.


Google-forms-banner trimmed.gif

Q: What is Weld?
A: Welding is used to join text or images together so they cut as one.  For example:

These two samples of text are unwelded. There is space between all the letters and that’s how they will cut out.


The text below is welded. The letters have been moved closer together so they touch and then weld has been selected from the Layers panel. How you see it is how it will cut. (Note that some letters do still have spaces between them, but that’s because they look better that way.)

Script text usually looks best when it’s welded.


Non script text generally looks better unwelded.


But welding isn’t just for fonts.  You can weld images together too.

Say I want to use this image to create a title across a scrapbook page.


I just duplicate the image the number of times I want on my layout, position them how I want them…


... then making sure they are touching, select them all and Weld.


Now they’ll cut as one object instead of 5 separate objects.


Another example would be if you want to make a shaped card.

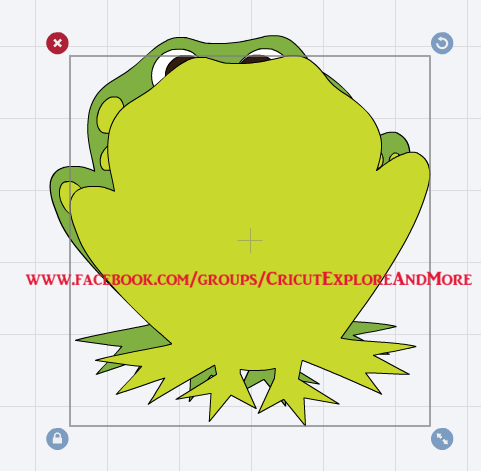
Let’s say you have this cute frog image from the Live Simply Cricut cartridge and you’d like to create a card that shape...


Start by adding that shape to your Design Space canvas.
Using the Edit bar, change the size to the height and/or width you want your finished card to be.


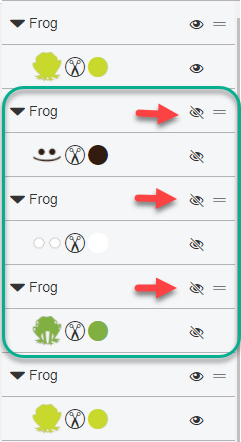
With the image selected go to the Layers panel and select Ungroup.


Click on the bottom frog layer then select Duplicate.


A copy of the bottom layer will appear.

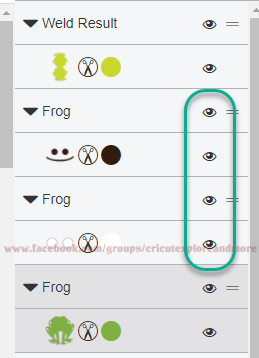
Click on the “eye” next to the three middle layers to hide them.  


Now only the two solid layers will be showing.


Decide whether you want a vertical folding card or a horizontal folding card. For this tutorial I’ll be making it a top folding card.


Select the top frog

From the Edit toolbar click the Flip button then select Flip Vertical. The image will be flipped upside down.


To ensure that the two images are symmetrical we also need to flip the top image horizontally.

With the image still selected click the Mirror Horizontal button.


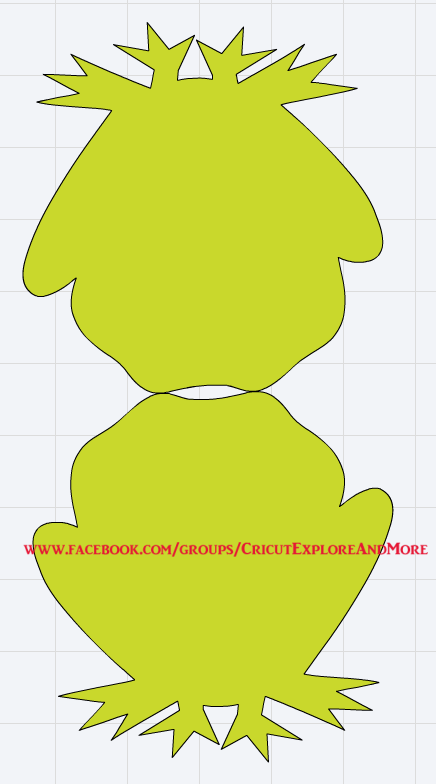
Now drag the top frog up and position it so the two heads are touching.  

It’s up to you how much you want these two pieces to overlap.


Select both frogs then click on the Align menu from the toolbar and select Align Left.


Now, with both frogs still selected, click the Weld button at the bottom of the Layers Panel.

You can see that the two images have been combined into one.


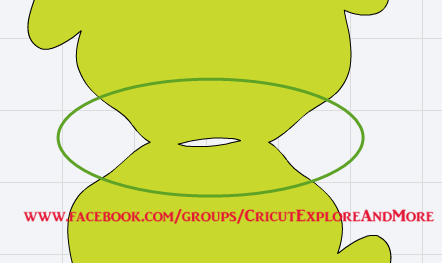
If you feel that the join isn’t going to be strong enough when the card is folded, select Undo (to reverse the weld process), move the two images slightly closer together then Weld again.


(Make sure that both images are still Aligned left otherwise your edges won’t line up.)


Go back to the Layers panel and click on the closed eyes to show those hidden layers.


Those layers will be positioned beneath the welded layer.

Select the welded layer then click on the Arrange menu and select Move to Back

You can now move the top layers into position on top of the welded layer to see your finished card.


Here it is as a horizontal card.


You can also weld text onto and inside images.


Notes about welding
Welding cannot be undone once you have closed your Design Space file.  You can use the Undo button to reverse the welding process even after saving your project. But if you weld, save and close that project you will not be able to go back and unweld.  It’s always a good idea to duplicate any images/text before you weld.


Happy crafting!  ♥



Sunday, April 30, 2017

CRICUT: Design Space 3

It's been a busy week in Cricut land with the release of the Design Space 3 open beta.

Lots of improvements in this version of Design Space although no extra features such as offset shadows.

The program itself is faster and above all... there is no more Flash!

I have put together a handy information document which covers the most commonly asked questions so far.  You can find that document in the pinned post in my Facebook group Cricut Explore and More.

I also have the following videos available:

Overview of the changes in Design Space 3:


Using Hide Contour in Design Space 3. 


Using Tags with uploaded images


Fixing the extra cutting lines in uploaded svgs bug


As soon as I've finished editing I'll add my other videos.

Happy crafting!  ♥


Wednesday, November 16, 2016

CRICUT: Design Space 3 Beta Previews

You might have heard that a new version of Design Space is currently undergoing Beta testing.

Today I am authorised to show you some previews of some of the upcoming changes.

Design Space 3 is much easier to navigate than the current version. You're going to find it much more responsive in many ways.  I have very slow internet and DS3 runs so much faster for me than DS2.

Here's some of the changes you can expect to see.


  • First, the Edit Panel has been moved to the top of the screen. This means that it is always available. 

No more moving between the Edit Panel and the Layers Panel.


  • The Layers Panel has had a slight makeover.  You'll see a coloured dot on each layer to indicate the selected colour of that layer.
  • And if you click on one of the layers you can instantly see which colours are currently being used in that project. No more having to remember which colours you used. 


  • Uploading file is so much faster now! And to help with that there's now a Drag & Drop feature. Just click on a file from your computer and drag it to the Design Space upload screen and drop it! 


  • The font preview screen has been enlarged. Now it's super easy to see what a font looks like.  


  • DS3 is written in HTML instead of Adobe Flash.  Shockwave crashes are a thing of the past. 


  • The Isolate letters feature has been changed to Ungroup to Letters.  Once you have ungrouped your text to letters you can still edit that text and change fonts on individual letters. 


  • You can also ungroup multiple lines of text into individual lines.  This is much quicker than creating a text box for different lines of text. 


  • Finding your saved projects is easy. Either click on the My Projects button on the canvas or click on the Projects button and select it from the Categories list. 


  • Speaking of your projects - they now have a preview! You don't have to guess what they look like anymore. 


  • Sometimes you realise you need to move images around on a mat after you've started cutting. Now you can!  Just click on the mat you want to change then click Edit Mat.


There's a lot to love about Design Space 3.  There's currently no indication of when it will be released and I can't give you any more details of the features yet. But from a performance point of view it's certainly going to be worth the wait!

Happy crafting!  ♥


Wednesday, August 17, 2016

CRICUT: Design Space - slicing text into two layers

A question in my Facebook group today prompted me to put this quick video together. It quickly demonstrates how to slice text into two layers.

As text is made up of individual letters, Design Space sees those letters as individual objects when it comes to slicing. And you can only slice two objects as a time. The video goes through the process of welding the text to make it one object.

You would use the method to slice into more than two layers. (For example if your image had several shadows/offsets.)

Just remember that once you weld text in Design Space it converts it to an image. And that means you'll no long be able to edit it. So be sure you have your text exactly how you want it before welding. Once you close your Design Space project you will no longer be able to use the Undo feature to unweld the text.


Happy crafting!  ♥


Related Posts Plugin for WordPress, Blogger...