
Todays post again comes from a question from Facebook.
Kelly asked how well the score tool worked. Some users are happy with how deep it scores, while others would like it to score deeper. It was mentioned that you can get the Explore to score twice which led to the question... "how do you do that?"
An easy way is to duplicate the existing score lines so that it scores twice.
Here's how you do that...
To demonstrate I'll be using the Mini Love Note card from the Make it Now projects.

This project has two parts that have score lines - the card itself and the envelope.
- Start by clicking on the All Categories box
- Select Cards

- Scroll down and click on the Mini Love Note project

- At the next page click on the Customize button

The canvas will open and all the elements from that project will appear.
I've marked the score lines on this project with arrows.

- Click on the envelope to select it

- Right click and select Detach from the drop down menu. (This detaches the score lines and the heart from the envelope.)

- Click inside the scored area on the envelope to select it.

- Click the Edit properties box to open it.
- Take a note of the X & Y properties. This will help us align our new score lines precisely.

- With the scoring lines still selected click the Duplicate button at the bottom of the Layers box.

A duplicate image will be placed on top of the original image. Because the original shape's "Line type" was Score, the duplicate image will have the same line type.

- In the Edit box change the X & Y co-ordinates to those that you noted earlier.
From: To:
To:
To:- Left click at the top left of the canvas and drag a selection box around the envelope to select it.

- Right click and select Attach. (You can also click Attach at the top of the Layers box). This will attach the score lines and the heart to the envelope.

Now repeat the same process for the card.
- Select the card

- Right click and select Detach

- Click any blank spot on the canvas. (This clears the cards X & Y coordinates. If you don't do that the coordinates of the card may appear in the Edit box instead of the score line).
- Click the score line to select it.
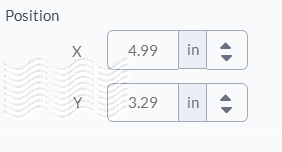
- Take note of the X & Y coordinates of the score line - X 4.99 Y 3.29
- Click the Duplicate button


- This may be a Design Space bug, because this time to select the duplicate score line and have the correct coordinates appear in the Edit box you sometimes have to drag your mouse around the image to select it rather than just clicking it.

- Change the X & Y coordinates to those that you noted earlier (X 4.99 Y 3.29)
- Drag your mouse around card and select Attach. The score lines are now attached to the card again.


- Click the Go button to check that your new score lines attached correctly. If you can't see any stray boxes or lines you'll know that it worked.
This picture shows two score lines in the top right corner. This means they haven't been attached to the card.

This image shows that all the score lines have been attached correctly.

Happy crafting! ♥


4 comments:
Thanks so much Narelle. I am using my explore so much more now thanks to you.
This worked great
Another awesome tut, Narelle. TFS! :-)
Thank you, thank you!!!
Great tutorial, thank you for sharing! I was searching for help fixing alignment of score lines in projects and came across this tutorial. I had to laugh as I am the designer of this card set. I appreciate your taking the time to sharing this tutorial! Happy Creating!
Post a Comment